


Let your warm personality be the first thing to welcome your guests, by displaying a custom stenciled door mat outside your door. Or if you would rather, keep unwanted visitors at bay with a stencil design, little bit of paint and a few selective words. Either way, this easy and inexpensive project will be so amazing, everyone will hate to wipe their feet on it.
Supplies:
- Custom Stencil
- Paper plate
- Acrylic stencil paint
- 3/4″ Stencil Brush
- Spray Adhesive
- Painters tape
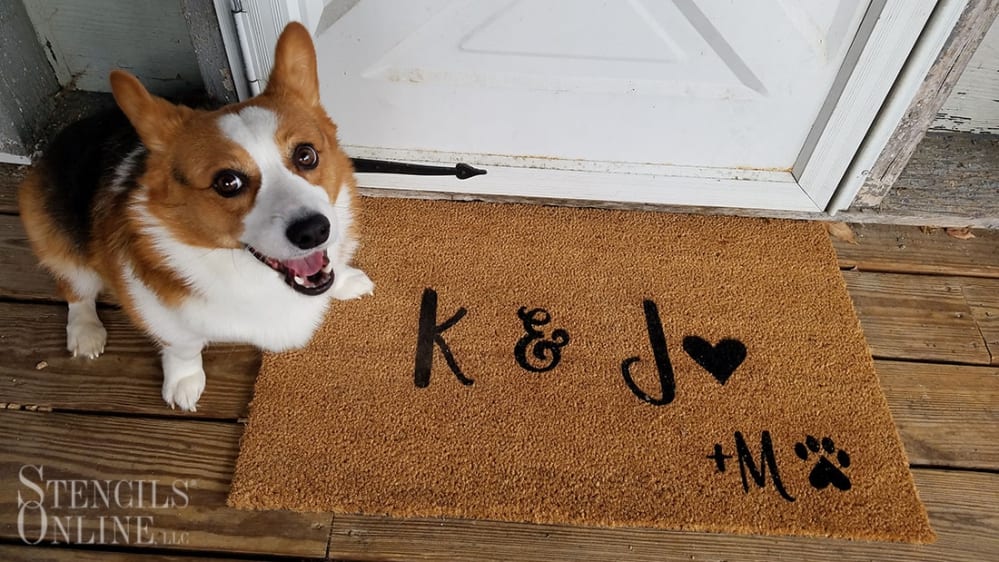
 Start by creating your custom stencil. Try out our custom stencil design studio. There are lots of fonts and tools in the designer that will allow you to create a stencil that matches your personality. I used a whimsy font for the initials and included some simple clipart. I laid out all of my text on a single sheet of stencil material because A: it helps save on costs and B: mylar is super easy to cut out with a pair of scissors (but solvent-proof and extremely durable)
- Once you physically have your custom stencil, you can begin making your custom mat!
- Gather all the supplies you will need for this project. In the video below I demonstrated what would happen if you decided to use a foam roller; IT DIDN’T WORK. So, I recommend using a large stencil brush for the application. The stencil brush will allow you to really get into the fibers of the door mat and get complete even coverage.
- Start by cutting the elements apart (if needed) and placing them on the mat to figure out the arrangement.
- Now that you have the placement and orientation figured out, spray some repositionable spray adhesive on the back of each part of the stencil. Or you can also use painters tape to hold the stencil in place.
- Start stenciling! While holding the stencil in place start stenciling using a stippling motion.
*REMEMBER, DON’T OVERLOAD YOUR STENCIL BRUSH WITH TOO MUCH PAINT!*
- To get the best coverage, you are really going to push down hard into the mat so that the paint will cover more than just the top portion of the bristles. It will seem like you are really beating up the mat, but it will be fine! It is nice because these types of mats don’t really show bleeding. The only way it is going to look funky is if the stencil moved while you were painting and you painted out of the normal area.
- I went over this a couple of times with the paint to make sure there was even coverage. Now that layer one is done we can start on the second part following the same steps.
- Wait for the paint to dry a bit once you are done and then apply a clear coat of latex spray paint to just the text. This should help keep the paint vibrant for some time while still being useful!
Have you created a custom doormat? Send us pictures, we love to see what our crafty, talented customers make. mail@stencilsonline.com
HAPPY STENCILING – KATIE, MIRI THE CORGI & STENCILS ONLINE